Ikea Play Kitchen Makeover
Kid kitchens are great for play and our kids love having one in our home. Making over a play kitchen is a simple and beginner DIY that anyone can do. In the past, I revealed our playroom for a One Room Challenge. One of the key components to the room was making over an IKEA Duktig kitchen.
This was an incredibly easy makeover that a beginner can complete to make their IKEA kitchen fabulous. If you have young kids and you love IKEA hacks, this is a great one for you. I’ll share how to paint the play kitchen, spray paint the hardware, use contact paper that looks like marble, and install fake backsplash.
This post contains affiliate links where I may receive commissions from your clicks and purchases. Please read my full disclosures.

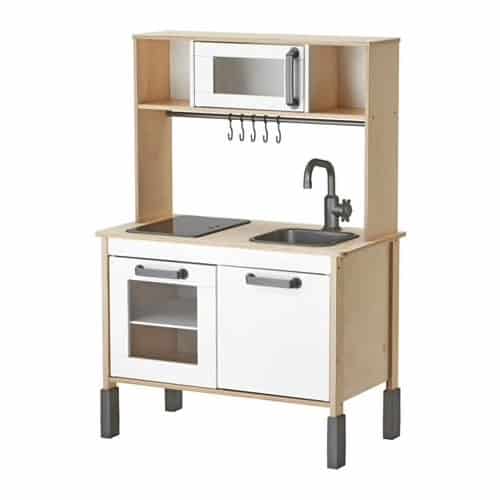
Ikea Duktig Kitchen
The Duktig play kitchen for kids from Ikea is made out of Birch. It’s so cute with cooktop lights that can be switched on and off that give a fun glow but they don’t get warm.
The legs are adjustable for kids with different heights and the sink can be removed to fill with water for play. I love that there are several other kid’s kitchen items available at Ikea to allow creativity in kids!
How to Assemble the Ikea Play Kitchen
The hardest part of the project? Putting the kitchen together using Ikea’s infamous picture only instructions and one million parts. We were able to tackle in an hour so I’ll say that’s a success.
An important thing to note, if you plan to paint the kitchen and change the countertop, do that before assembly. Take it from me friend, you do not want to assemble, to have to disassemble, to have to reassemble it all again. Also, consider a multipurpose hand tool or a hex key for the drill to make assembling quicker.


Painting the Ikea Play Kitchen
I chose to paint the kitchen and the hardware. It did take several coats of chalk paint to cover this surface. I also tried several “brass” spray paints before finding the perfect one for our home. Finally, I would recommend sealing both the kitchen and the hardware. They will take a beating by little hands!
Chalk paint covers the kitchen well but you’ll never go wrong by prepping before painting. I skipped this step but you can prep with primer and lightly sand before using chalk paint.


Tips for Spray Painting Ikea Hardware
When you use spray paint on metal or plastic surfaces, always test first. It’s best to hold the can upright in a well ventilated space. Press the top down and make a quick pass with a light spray, letting go after each pass. Let it dry and repeat as needed.
Construct the Play Kitchen Backsplash
This was the fanciest part of the makeover. Let me tell you, after working with the peel and stick tile, I was ready to demo my subway tile in the kitchen and replace it with peel and stick tile. I’m pretty sure my husband would not go for that idea though. I’m also not sure how that would pan out with future home buyers.

I used this peel and stick tile.
As backing, I used foam poster board. Honestly, if you have access to a piece of wood that can be cut to size, I would go that route for durability. However, our foam board is holding up nicely!
Measure your opening, cut the board to size, then apply the foam tile. I used liquid nails to attach it to the back of the kitchen. If you use board, you could also use nails for this part.
Makeover the Countertop with Peel and Stick Paper
Learn from my mistakes, do this part before assembling the kitchen. I did not and had to take the kitchen apart to get the contact paper to stick properly. It does get tricky when trying to cover the corners of the countertops.

Frequently Asked Questions
- What size is the Ikea play kitchen? The play kitchen measures at 28 3/8″ x 15 3/4″ x 42 7/8″
- What is the quality of the Ikea Duktig Kitchen? The kitchen is made from birch and is nice quality. It is typical Ikea quality wood that is not overly thick or solid, but it is sturdy and well constructed.
- What age is the Ikea play kitchen ideal for? Ikea recommends the use of this kitchen for ages 3 and older.
- Is a play kitchen worth it? On average, play kitchens range from $200-$600. The Ikea Duktig kitchen is $99 in store.
- How does the sink work on the play kitchen? The Ikea play kitchen has a sink that is basically a bowl that can be removed and filled with water or emptied after play.
Recap and Instructions: Ikea Play Kitchen Makeover
- Paint the pieces before assembly.
- Makeover the countertop.
- Assemble (in one million easy steps).
- Paint the hardware.
- Attach backsplash.
- Attach hardware.

Make this Ikea playset makeover easier with the step-by-step instructions in the craft card below!
Ikea Play Kitchen Makeover

Want to give your kiddo an all-modern play kitchen? Here's how to give this Ikea kitchen play set a chic modern upgrade!
Materials
Instructions
- Paint the pieces before assembly. Take it from me friend, you do not want to assemble, to have to disassemble, to have to reassemble it all again. It did take several coats of chalk paint to cover this surface. I also tried several "brass" spray paints before finding the perfect one. Finally, I would recommend sealing both the kitchen and the hardware.
- Makeover the countertop. Learn from my mistakes, do this part before
assembling the kitchen. I did not and had to take the kitchen apart to get the contact paper to stick properly. It does get tricky when trying to cover the corners of the countertops. - Assemble (in one million easy steps).
- Paint the hardware.
- Attach backsplash. As backing, I used foam poster board. Honestly, if you have access to a piece of wood that can be cut to size, I would go that route for durability. Measure your opening, cut the board to size, then apply the foam tile. I used liquid nails to attach it to the back of the kitchen. If you use board, you could also use nails for this part.
- Attach hardware.
This IKEA Duktig kitchen makeover was easy peasy folks. While it was a breeze to complete, it did require a little bit of patience when assembling the kitchen. The possibilities are endless and I challenge you to step outside of the box to make it fit your own personality. Your little ones will absolutely love it! As always, head over to my Instagram page where I have saved stories while completing this project to my highlights.
While this furniture makeover was for the kids, find more inspiring furniture makeovers below!
- How to Sand, Bleach, and Whitewash Wood Furniture
- Refinishing Furniture: The Provincial Dresser
- Butcher Block Countertops


Great tips! I love how your kitchen turned out to be though. The golden details are lovely and give space rustic, yet modern charm. I’m certain you’ll make some wonderful memories here. 🙂