Refinished Cane Bed Tutorial

Refinished Cane Bed Tutorial – A Serena & Lily Dupe


For the longest time, I have wanted the Harbour Cane Bed from Serena & Lily for our guest room. Unfortunately, that particular bed was not in my budget, so I set out to make my own. I don’t consider myself savvy enough to construct my own bed, so I started scouring the internet for a bed that I could refinish, apply cane, and call it a dupe! Here’s how I did it.
This post contains affiliate links where I may make a commission from your clicks and purchases. Please read my full disclosures here.
Finding the Perfect Bed for a Refinished Cane Bed
Week after week, I went to all of the local consignment and thrift stores, looking for the perfect bed to makeover. I searched Craiglist and Facebook Marketplace daily. I finally put out an “In Search of” post on our local Facebook mom group and a local person sold this bed to me for $50.

When searching for the perfect bed to refinish, it needed to meet these criteria:
- Complete bed set including a headboard, footboard, and side rails.
- Rectangular shaped headboard and footboard with minimal details.
- Cutouts or flat spaces where cane would sit.
- Constructed of real wood or the ability to strip the finish.
- Price tag less than $50.
How to Make a DIY Cane Bed: Step-by-Step Instructions
Step 1: Removing Old Wood Stain
Part I – Refinishing Items Needed
- Rags (you will need several rags)
- Cheap paintbrush
- Appropriate protective gear (per instructions on products used)
- Water bucket
- Soft brush or sponge
- Saran or cling wrap
- Citristrip
- Plastic scraper or plastic putty knife
- Small wastebasket for stripping waste
- Klean-Strip After Wash
- Clorox Splashless Bleach
Part 1 – Refinishing Instructions
- Step 1: Using a paintbrush, paint on a thick layer of Citristrip. Work in sections and cover with Saran Wrap. Start by letting it sit for twenty minutes. Some pieces of furniture respond better if you let them sit for hours.
- Step 2: Gently, use the scraper to remove the first layer.
- Step 3: Use a water bucket and soft brush to gently wash off some of the goo between the layers, being careful to not damage the wood.
- Step 4: Repeat steps 1-3 as necessary.
- Step 5: Apply Kleanstrip Afterwash to remove all remaining finish and Citristrip (follow the product recommendations for proper safety recommendations).
- Step 6: Apply thin layers of bleach with a rag and let it sit in the sun for a few hours. Repeat a few times and then wipe clean with vinegar.


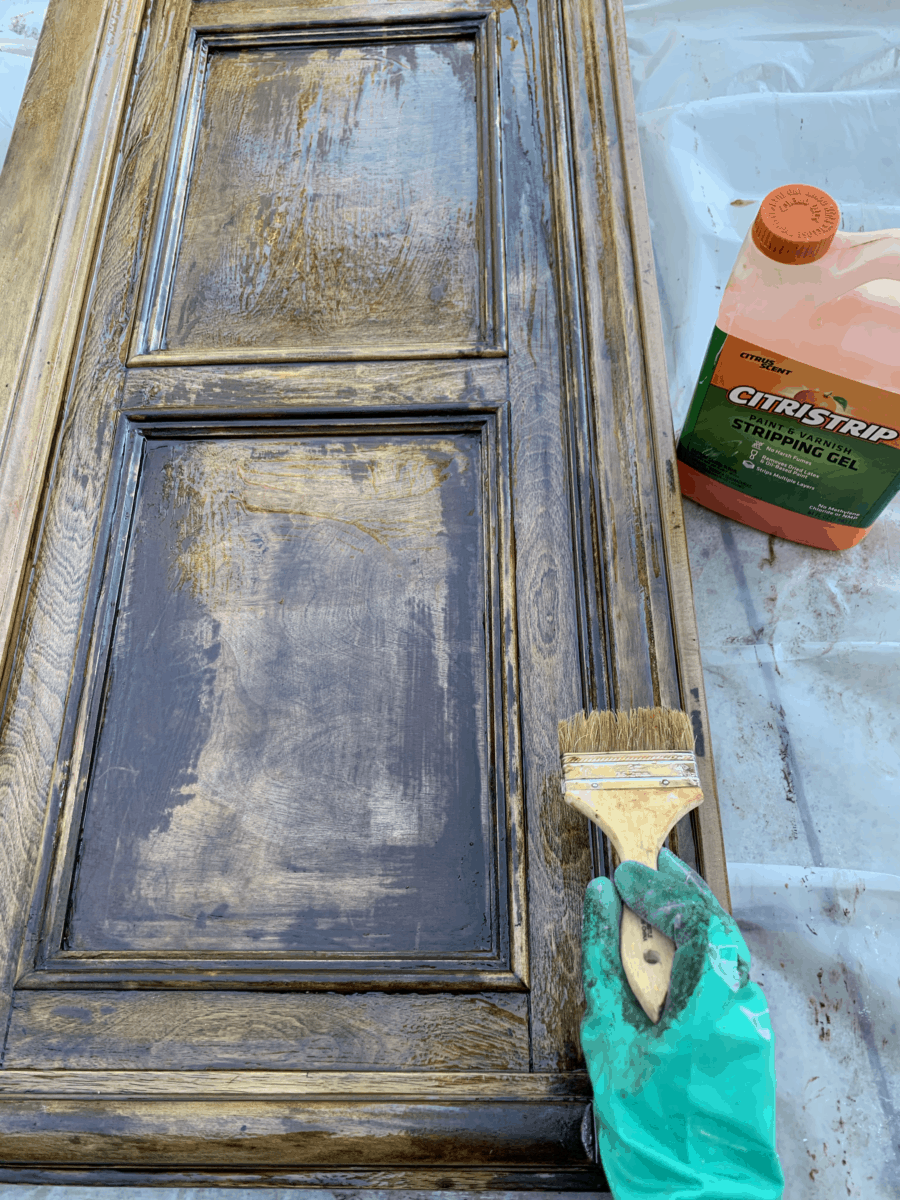


I repeated the Citristrip process several times and then lightly bleached the bed. Bleaching the wood was easy. All I did was wipe bleach on the wood and let it dry in the sun. I repeated this a few times and wiped the wood with vinegar. I stopped here in the refinishing process because the color of the wood was perfect!
If you are unhappy with the color of your wood after stripping it, you can find how to refinish and bleach furniture here. If you’re refinishing furniture with veneer, you can find how to sand and strip veneer here. I also skipped sealing this piece, which I never recommend. This bed will sit in our guest bedroom that is rarely used. It is recommended to seal natural pieces to protect the wood from watermarks, etc. I plan on sealing it eventually when we use it for my daughter. Find out how to seal furniture here.
I have found that each piece of furniture varies and sometimes leaving Citristip on for longer periods of time works better. I suggest starting with twenty minutes and testing a small area for results, then adjusting the duration as you continue with the project.
Step 2: Applying Cane to the Bed Headboard & Footboard

There are several methods for applying cane to furniture and the method you will use honestly depends on your specific piece of furniture. Ideally, furniture pieces with cutouts are recommended when applying cane. However, this piece had perfect rectangular shapes with wood backing. I decided to apply the cane on top of the wood, then cover the edges. Covering the edges became a task but I was able to think outside of the box. By using small staples, I was able to paint them to match the cane and they blend perfectly into the natural texture. There are several other methods for applying cane and I will provide a round-up of those soon.
So how did I apply the cane? You will find the steps I used for applying the cane here. As a reminder, this is very specific to this bed and will need to be adjusted for your piece of furniture.
Part II – Cane Items Needed
- Cane – I used this cane (W901) from Frank’s Cane and Rush Supply. They are wonderful and if you call to speak with them about your project, they can help you determine what to order.
- Staple Gun
- Staples – Arrow T50 17/32″
- Paint to match your furniture finish. I used Clark + Kensington Satin – Rustica (N-W31) from Ace Hardware. You can also use Minwax Polyshades.
- Paintbrushes – I used a standard brush to paint the cane and a tiny detailing brush for the staples.
- Hammer
Part II Instructions – Applying Cane
- Step 1: Measure the detailed spaces where you will apply cane.
- Step 2: Cut pieces of cane for your detailed spaces.
- Step 3: Lay the cane flat and staple the cane as close to the edge as possible. I put one staple every 1/2 inch to 1 inch around the edge.
- Step 4: If your staples are not flush, hammer them flat. The point of this is to make them blend into the natural cane texture.
- Step 5: Paint the cane and staples (see below, you can omit this step or I recommend performing this step PRIOR to applying the cane, if possible).
- Step 6: Using a tiny detail paintbrush, paint the staples.


Please read: It works best if you paint or stain the cane FIRST, before applying it to the furniture. It is recommended to soak the cane prior to applying it so that it stretches and then shrinks when applied. I did not paint the cane first because I was planning on keeping the natural color, but did not like the yellow of the cane with the refinished bed. I did not soak the cane because I did not need to stretch it when simply placing it flat on the furniture. Also, you may notice that the cane appears slightly wrinkled in places when wet with paint, it should dry flat and lose the wrinkles.
Also, note that using staples really only works if you plan on painting them to blend in with the cane or covering them with trim. You can try spray painting them before installing them. Or, you can cover with a small piece of trim. For more options and tutorials for applying cane, I will post other methods soon.
Print out the steps to my refinished cane bed tutorial using the craft card below!
Refinished Cane Bed Tutorial

Love the look of cane furniture? If a designer cane bed is out of your budget, here's how to create the perfect cane bed dupe! A full step-by-step refinished cane bed tutorial.
Materials
Refinishing Items Needed
- Rags (you will need several rags)
- Cheap paintbrush
- Appropriate protective gear (per instructions on products used)
- Water bucket
- Soft brush or sponge
- Saran or cling wrap
- Citristrip
- Plastic scraper or plastic putty knife
- Small wastebasket for stripping waste
- Klean-Strip After Wash
- Clorox Splashless Bleach
Cane Items Needed
- Cane
- Staple Gun
- Staples - Arrow T50 17/32"
- Paint to match your furniture finish
- Paintbrushes
- Hammer
Instructions
Part 1 - Refinishing Instructions:
Step 1: Using a paintbrush, paint on a thick layer of Citristrip. Work in sections and cover with Saran Wrap. Start by letting it sit for twenty minutes. Some pieces of furniture respond better if you let them sit for hours.
Step 2: Gently, use the scraper to remove the first layer.
Step 3: Use a water bucket and soft brush to gently wash off some of the goo between the layers, being careful to not damage the wood.
Step 4: Repeat steps 1-3 as necessary.
Step 5: Apply Kleanstrip Afterwash to remove all remaining finish and Citristrip (follow the product recommendations for proper safety recommendations).
Step 6: Apply thin layers of bleach with a rag and let it sit in the sun for a few hours. Repeat a few times and then wipe clean with vinegar.
Part II Instructions - Applying Cane
Step 1: Measure the detailed spaces where you will apply cane.
Step 2: Cut pieces of cane for your detailed spaces.
Step 3: Lay the cane flat and staple the cane as close to the edge as possible. I put one staple every 1/2 inch to 1 inch around the edge.
Step 4: If your staples are not flush, hammer them flat. The point of this is to make them blend into the natural cane texture.
Step 5: Paint the cane and staples (see below, you can omit this step or I recommend performing this step PRIOR to applying the cane, if possible).
Step 6: Using a tiny detail paintbrush, paint the staples.
Final Thoughts on This Refinished Cane Bed Project
Looking Back – What I Would Do Differently Next Time
If I could go back and do this over, I would try to find a bed with actual cutouts. Or I would figure out a way to remove wood and create cutouts. In addition, my biggest regret is painting the cane after applying it. I highly recommend performing this before applying the cane. It worked for us, but it could go wrong for you!
The Perfect Serena & Lily Dupe
I am so impressed with the final result of this bed. I love the natural wood finish and the texture of the cane! I feel like you can customize this bed to your needs and it is a win for everyone.


That’s it for this project! Honestly, I think this is an easy project to complete, with proper planning, tools, and patience! Have you completed a cane bed recently? I would love to see your projects, please comment below with your link or send me an email with results!


This is by far my favorite project on the internet as of now! Nice work!
OH my goodness, you are so sweet and thank you for following!
Love this!!
Thank you!
I love this! I have the exact same bed in a King. Can you give me an idea of how much cane you ordered? With shipping being slow right now I want to get it right the first time. Thank you so much for posting this! I was about to order a still expensive dupe for this bed, perfect timing!
Hey! I recommend measuring the exact spaces you plan to cover and calling Frank’s Cane and Rush Supply. They can tell you exactly how much you will need order! Sadly I did not write down the amount I ordered, they told me over the phone and sent it to me!
Thank you Amy!